Thursday, 19 December 2013

PIMP YOUR PATTERN: RAINBOW TWIRL FAUX SHIRRING

If you have a little one with sensitive skin or who is irritated by shirring, give faux shirring a go!

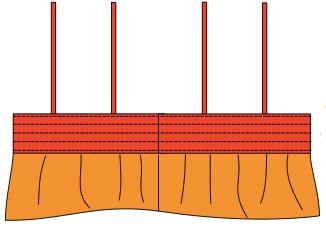
Here is a quick guide on how you can modify your rainbow twirl pattern to have faux shirring on the bodice. 

* Grab yourself some elastic 9mm-15mm wide.. whatever you have handy!

1. Cut out bodice pieces according to the pattern.  Cut an extra set of bodice pieces to be used for the lining. 
2. Sew down one side seam of the bodice and bodice lining.
3. Position straps according to the placement in the pattern, pin them on the bodice and lay the bodice lining on top.  Right sides of bodice and bodice lining are facing.  Sew along the top.
4. Fold the bodice lining into position, press and top stitch. 
5. Run rows of stitching around the bodice and bodice lining approx elastic width + 5mm apart.
6. Attach bodice to the skirt according to the pattern.
7. Measure the chest of your little one or use the chest measurements in the pattern as a guide.  Cut lengths of elastic around chest measurement less 25mm-40mm (based how stretchy the elastic is that you are using, the more stretch the elastic has, the larger the amount to take off).  

Thread elastic through the elastic casings you have created securing at both ends.
8. Complete the dress according to the pattern. 

Note: To minimise the elastic bulk, I would probably overlock each side seam separately, then stitch the side seam. and top stitch the seam allowance down on either side of the seam, at least for the bodice section of the dress. 

The same technique can be applied to the shirred dress pattern, but you just need to change the construction sequence so that only one side seam is sewn at the beginning of the pattern.

Thursday, 17 October 2013

PILLOWCASES FOR CHRISTMAS

I have always wanted to do something more to encourage people to make and donate pillowcases to Pillowcases for Oncology kids.  You can read more about them here.

Earlier this year I released a pillowcase pattern after being inspired by a little BOO! friend called Grace.  It is a 'Design Your Own' pattern and has a number of different styles of pillowcase as well as applique templates and information on how to appliqué. 

I decided that rather than just offering the pattern for free, I would charge $2 for it with all profits going to different charities.  Everytime I hit $500 in profits, I will send to a different charity.  We are REALLY REALLY close to the first $500 that will be going to 'Hampers for Ward 3B Families'.  You can read more about them here.

You can purchase the pillowcase pattern here for the bargain price of $2!

You don't have to buy my pattern though, you can just grab any old pillowcase out of the cupboard and draw up a pattern from that! 

So what's the plan???

Let's have a Christmas Pillowcase Drive!


I want you to make one OR MORE Christmas inspired pillowcases.  It does not have to be made with Christmas fabrics, but should have a Christmasy feel.

Get your kids involved.  My son is only 4 and he loved helping me pick out some fabrics and do my pinning while I was making pillowcases and I explained to him about what they were for.  He was excited to have helped make a pillowcase for the sick kids in the 'hostible'!  We made 6 pillowcases together in 1.5hrs!

Consider boys and girls, young kids and teens when choosing fabrics. If you make one that is more suited to a young girl, then why not make one for a teen boy as well! 

All pillowcases should be sent to me so that I can collate them and then send them as one big package to Pillowcases for Oncology Kids. 

I would like all pillowcases posted NO LATER than 15 November and will put my delivery address in Pattern Club! 

Let's decorate some hospital rooms with some BOO! love this Christmas!

Monday, 12 August 2013

PIMP YOUR PATTERN: ADD A SASH BOW TO YOUR PINNY


GET THE 'FOR MONSTER AND MISS' LOOK
Marilyn has kindly shared her secrets for how she adds a sash to her pinny!

 
1. Make your pinny to where you have attached waistband facing (before sewing the side seams *step 17*)
2. Cut 2 strips of fabric 4" x 20" (10cm x 51cm).  With right sides together sew 3/8" (1cm) seam along open long side and across short end. 
3. Fold the stitched end at right angles and press. Now stitch along this line.
4. Trim along the angled line and snip pointed ends. Turn sash right side out and press.  Make 2 sashes the same.
5. On the raw end of both sashes do a gathering stitch and gather up to match width of waistband. 
6. Pin then baste in place. 
7. To make the bow holder, cut a piece of fabric 3" x 2.5" (7.5cm x 6.5cm)
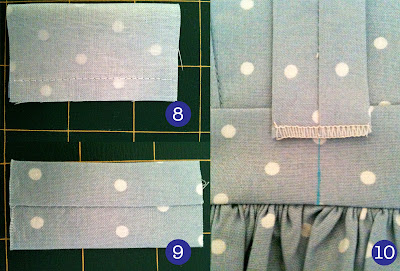
8. Fold in half with right sides together along the longer edge and sew 1/4" (0.7cm) seam. 
9. Turn right side out and press with seam down the middle. Overlock both raw edges.  Find centre of bodice and mark with fabric pen.  Keep facing of waistband towards bodice as you don't want to catch it when you sew the bow holder in place.
10. Pin bow holder right side down onto waistband approx. 1/4" (0.7cm) from top of waistband, lining up centre and seam of bow holder. Sew bow holder in place making sure to reverse stitch either end to secure.
11. Fold other end of bow under 1/4" (0.7cm) and sew along bottom of waistband.
12. Thread pointed end of sash through bow holder
13. Thread the other sash through holder 
14. Now take the pointed end of the left hand sash and thread through holder 
15. Then repeat with the other sash 
You now have your sash bow. You can handstitch to keep in place but I prefer not to as it makes it easier to iron after laundering.

Thursday, 8 August 2013

PIMP YOUR PATTERN: ADD A FLUTTER STRAP TO THE PINNY

You may remember I mentioned that I didn't want to tell you EXACTLY how to put a ruffle on your pinny strap because I don't want every single pinny out there to look the same.  I want you to use your imagination and play a little rather than me telling you what to do!  

I won't provide exact measurements, but I will give you a few diagrams to help you figure out HOW to go about it! 

** Illustrations show how to create 1 strap, so you will need to do everything shown twice **


1. Add 2cm to the width of the strap measurement.  
2. Cut each strap in half lengthways
3. Decide the style or shape of the ruffle you are going to add and cut it out! 

Here are some of the popular options:
  • Rectangle: Cut a strip and then fold in half lengthways, the fold will create the 'finished edge' of the ruffle.
  • Shaped: Ruffle is wider on the shoulder and narrower towards the waistband.
  • Other: Add Ric Rac, or piping or lace, you are only limited by your imagination!
How long should it be?
I think a ratio of about x1.8 - x2.0 of the strap length works (e.g. if strap length is 10, then anywhere between 18 and 20 will look good)!  Just have a play until you get a ruffle factor you are happy with and then write it down so you remember it for next time! 

How wide should it be?
Entirely up to you, figuring this out will give you your own unique look! Take a look in the pattern club and see what others have done to figure out what you like, wide, narrow or somewhere in the middle! 

4. Finish the edge of your ruffle if applicable with a rolled hem or narrow hem and then create gathering stitches on your straight/raw edge
5. Place the ruffle face down on one side of your strap and baste into place
6. Place the other side of the strap face down on top of the ruffle and stitch
7. Pull the strap pieces up away from the ruffle so the right sides are facing out and press between the ruffle and strap to create a nice crease. 
The next steps are a bit like creating a binding.

8. Fold the strap back to the previous position over the ruffle, then take one of the strap ends and fold to up to the raw edges, then press (try to move your ruffle out of the way in this step so you don't crush it)!
9. Open the strap back up and now align the raw edge with the fold line created in the previous step 
Repeat steps 8-9 for the other side of the strap.

10. Fold both sides of the strap away from the ruffle and press.
You are done and ready to continue on with inserting the bodice!
Good Luck!


Tuesday, 6 August 2013

BOO ILLUSTRATED! - DESIGN YOUR OWN RAINBOW TWIRL PROMO

For the last few years, people have been asking for the Rainbow Twirl in bigger and smaller sizes and how to make it with more or fewer tiers or different lengths and this is my answer to it. 

It is essentially a whole new pattern (a bit of a 'Design Your Own Twirly Dress') which happens to incorporate the concepts from the Rainbow Twirl pattern as well!

So what is different from the original and why would I buy it again?
  • FOUR 'flexible sizes'
    • XS: 6M (00) - 18M (1)
    • S: 2-4 
    • M: 5-7
    • L: 8-10
  • Choose from 4, 5 or 6 tiers
  • Design Your Own dress option
    • Calculations to help you create the perfect dress using your little monkey's measurements with just the right amount of twirl factor and as many tiers as you want!
  • Fully illustrated

To celebrate the new pattern, I am offering a SUPER SPECIAL for 2 weeks only for AUD$5 when you use the code 'ILLUSTRATED'.
To purchase, visit my website: www.boodesignaustralia.bigcartel.com

Special thanks again to the awesome ladies who helped me test!  Here are some of their cute creations!


PATTERN MASH - 10 SEPTEMBER

So what is a pattern mash you ask? 

Whenever I have purchased patterns in the past, I have always tried to change them just a little bit to make them unique to me.  Fabric selection is important for individuality, but doing little tweaks to patterns can be just as important to help you stand out in the crowd.


I design my patterns the way I like to use them.  I include lots of options so that they don't all look exactly the same and design them so they can be mixed in with my previous patterns as well as with the ones still sitting in my sketch book or in my head.  I try and make them versatile enough for you to take an element that you like in one pattern and apply it to another. 

Examples of pattern mash's: 
  • Overalls top with a Twirly Skirt bottom
  • Pinny with flutter straps (a few of you are familiar with that one)
  • Rainbow Twirl with Shirred dress flutter straps
  • Romper with pinny skirt
Why stop with my patterns though??  Do you love something in another pattern you have used?  Why not mix it up with a little BOO! to give you something super awesome and different. 


To encourage you to do that, I bring you the..... 

BOO! PATTERN MASH SHOWCASE


  • Pick 2 patterns (or more) that you think would make a great mash.  ONE pattern must be BOO!
  • Make your mash the best it can be, something you haven't seen before or have always wanted to try and most importantly, have fun!
  • There will be 2 sections in the album; available to purchase and admiration gallery (not available to purchase)

The showcase will be held 10 September on my BOO! Designs facebook page.  I will start uploading photos 2 weeks before the showcase, submissions must be in by 7 September at the latest.   

Photos should be submitted in the BOO! Designs Pattern Club PATTERN MASH ALBUM and must have the following information (in this order).

1. Category: AVAILABLE FOR PURCHASE or ADMIRATION GALLERY
2. Patterns: BOO! pattern/s used in mash (and others if you wish to list them)
3. Mashed design name: Be creative, give your design a name! 
4. Name: Business page on facebook (if applicable) or your first name
5. Size
6. Purchase Price (include postage price): e.g.  $50 + $2 regular postage


So excited to see what you create... now get mashing!


Wednesday, 24 July 2013

NEW DRAWING ADDICTION

It started innocently enough, for the Overalls pattern, I had to get some illustrating software to be able to draw the pattern pieces.  I had never used something like that and the learning curve was steep, but I do like having control over stuff like that and it is much easier to do it all yourself to get someone else to do it and then send them a hundred changes!  I like the idea of getting it done NOW and not relying on someone else's timeframes.  If I knew then, what I know now, it would probably only take about 80hrs instead of about 800hrs to do the pattern pieces for the Overalls! HA!!

It didn't even really occur to me that I could use illustrating software for illustrating!  Yes, I KNOW!!!!  Probably more that I had no idea I would even be able to draw.

Then, the words I didn't really want to hear popped up from my romper pattern testers.  Some of the pics are not clear enough to show whether it is the right or wrong side of the fabric and the fabric makes it a little hard to see what is going on. 

Honestly, THE WORST WORDS YOU WANT TO HEAR when you have spent so long making something and stopping every few minutes to take photos, then editing the photos and loading them into the pattern. 

So... I had 2 choices, make another romper and redo all the photos OR, just bite the bullet and have a go at illustrating.  

The illustrating won out!  I figured I wanted to do it 'one day' anyway to get the pattern into a more friendly version to publish as a paper pattern, why not do it now! 

Now I want to draw everything, I watch Dora and go 'Hey, I could totally draw that!' or look at napkins in the supermarket and think, I could draw that picture! 


Loving my new addiction and I hope all the people who were not too sure about illustrations over photos can be converted.  It got a big thumbs up from the pattern testers, so fingers crossed it is a winner all round!   


I eventually want to redo all the patterns as illustrations, but there are only enough hours in the day!!! 


Tuesday, 18 June 2013

PIMP YOUR PATTERN: CRISS CROSS PINNY

GET THE GEORGIE PORGE LOOK!

The talented Emma from Georgie Porge started sewing around 2 years ago, but only started sewing clothing in February this year.  The first clothing pattern she attempted was the BOO! Designs Shirred Dress pattern, and the rest is history... her new found passion was born.  She is lucky enough to have 2 stunning little girls to sew for but also offers custom spots on her page periodically when time permits.

I love what Emma does with my patterns, she adds a whole new girly dimension that I never even consider and WOWed everyone with her take on the pinny pattern.

With a little bit of arm twisting, Emma agreed to whip me up a masterpiece so that I could then tell you how to make it! 

What do you get when you cross a TWIRLY SKIRT with OVERALLS?

CRISS CROSS PINNY


Pattern pieces required 
  • Twirly skirt 'skirt' measurement; multiply the length by 1.5 and use the width from the pattern
  • Use all pattern pieces from the overalls except for the legs/cuffs


Instructions
  • Complete as per the overalls pattern but insert the skirt instead of the pants 
  • For the back skirt, gather the skirt to fit the back waistband (gathering is not required for the back of the overalls normally)
  • After completing the side seams, then hem your skirt


...AND AS EASY AS THAT YOU CAN HAVE A MASTERPIECE LIKE GEORGIE PORGE


Friday, 14 June 2013

*SHOWCASE* PATTERN MASH - SAVE THE DATE


SAVE THE DATE 10 SEPTEMBER 2013

Due to many requests, I have decided to host a BOO! showcase on my facebook page.  To make it interesting it will be a Pattern Mash theme.  Each of my patterns is designed taking into consideration what I have already done and what I have in my head and coming next.  I like to put elements in the patterns that you can take from one pattern and use in another. 

A pinny with overalls pockets, an overalls top with twirly skirt bottom, shirred dress flutter straps added to the rainbow twirl, shirred dress flutter straps added to pinny... you get the idea!

Being unique and creative makes you stand out from the crowd.  People email and message me to ask me if it is ok for them to change elements of my pattern and my answer is OF COURSE... that is what I WANT you to do!  I give you a bit of a canvas with lots of options to inspire you, but nothing makes me happier than when people think outside the square and add a little piece of them to the patterns.

With that in mind, the idea of this showcase is to use at least ONE BOO! Designs pattern and mix it with any other pattern you like (doesn't have to be BOO!).

If you have a business page, you determine your own pricing and keep the proceeds from the sale of your item.  If you don't have a business page, but want to play along, that is no problem, your items will be added to the end of the album on BOO! so that you can share your creation, but it will be made clear that it is not for purchase. 

A limit of ONE item per person can be submitted to the showcase, but you are more than welcome to make and sell as many items as you like on your business page or show them off in the pattern club!


Saturday, 4 May 2013

DESIGN YOUR OWN... PILLOWCASE!


12 days ago a photo was posted in BOO! Designs Pattern Club that tugged at the heart strings of a lot of people including me.  It had the most likes and comments of probably all the photos ever posted in the club.  

This is that photo... 

I received a bunch of messages from strangers asking me how and if they could do something to help.  

I spoke to Alana, the lady who posted the photo and she asked that we do something for Pillowcases for Oncology Kids and from that a seed was planted! 


Introducing Design Your Own Pillowcase


I have created 4 different variations of pillowcase from the most simple that people who have never sewn can put together to something a little bit more challenging and fun!    It also includes some new ideas and techniques that you can incorporate into your existing BOO! patterns like patchwork and applique.


After thinking about it, I thought why help just one charity when we can collectively help more than that.  By charging $2 for the pattern, the profits can be donated to other deserving charities as well.

Among the other larger charities that Alana had mentioned to me was a small one that I thought would be the perfect recipient by the name of Hampers for Ward 3B Families. 

When $500 is reached, I will send the money to this charity and then choose another charity to donate to.


Read on if you would like to know more about 'Gracie's Story', 'Pillowcases for Oncology Kids' and 'Hampers for Ward 3B Families'.


Gracie's Story (by Mum, Alana)

On 22nd January this year, a very large cancerous tumour was discovered in Gracie's chest.  The day before we had been at surf club and Gracie was having trouble running. We thought maybe she was asthmatic, so we took her to the doctor. The next day we found ourselves in the cancer ward. They believe her cancer is treatable, but it is rare and hard to reach. We expect treatment to take the rest of the year. Perhaps the most sad part of our story is that we can't take Gracie home, as we live outside the safe distance from hospital while receiving treatment. Her Dad and sisters (age 3 and 6) can only visit on the weekends, and I alternate my time with her and at home, each for a week at a time. Her Grandma's are where I am not, taking care of my darlings and my home, and my Princess Grace. One week before Gracie got sick I opened my Rosie Petal shop on facebook. I continue to sew, but can't as much as I want to, but it is a welcome distration. I love checking up on the Boo! Pattern Club while we pass the boring hours in hospital. We get scans next week, so will soon know how well this first 12 weeks of chemotherapy has gone.  

Pillowcases for Oncology Kids

Our Vision for 'Pillowcases for Oncology Kids' is to provide every child undergoing treatment for cancer a pillowcase to brighten up their room.

We want to see every child smile :) and with all our pillowcases being made and donated with tonnes of love it is sure to put a big smile on every child's face when they reciieve a pillowcase from POK.
'keep smiling.....it's contagious'

Hampers for Ward 3B Families

My name is Crystal French I have a 5 year old daughter on ward 3B who has been receiving treatment for pre b acute lymphoblastic leukaemia. When we were first diagnosed back in March 2011 I was left on the ward for 3 days with no tooth brush, soap or anything. Not wanting to leave Christine's side I went without. 
I started Hampers for 3B Families Christmas 2011 and we made toy hampers for the family's on the ward for Christmas, since then I have made hampers for Easter, Birthday's, Mother's and Father's Day, as well as new patient hampers. All hampers are made out of 100% donated items, I don't receive from any corporations, or businesses it is purely out of the goodness of people's hearts. 

Saturday, 13 April 2013

Design YOUR Own


So what are these 'Design Your Own' Patterns all about?

If you have the Shirred Dress Pattern you would have read that as a kid, I loved the concept of Choose Your Own Adventure books.  You come to a fork in the road and can either go left or go right.  If you go left, there is a bag of chips, if you go right, there is a block of chocolate.   If I got to the ending and didn't like it, I would start again until I got the outcome I wanted or I would cheat and flick back a few pages and change the ending.  I would have been searching for the chip ending by the way, I love chips!!

So what that all really means is that in the handmade world, I don't think it matters if 1 person has a pattern or if 1,000,000 people have that pattern, it is what you do with the pattern to make it your own that makes the difference.  The fabric you choose, the options you choose and the YOU that you bring to the pattern is what makes it unique.  Make it a different way every time or if you don't like the ending or want a more fabulous ending, then change it! 

I give you ideas by providing lots of options in patterns, but then, I encourage you to take it even further.  Take what you have learnt in one pattern and apply it to another (whether that be my pattern or someone else's).

You may ask why there are no flutter sleeves on the pinny pattern.  Trust me, it went in and out of the pattern and in and out of my head so many times that it wasn't funny.  At the end of the day, I simply didn't want to tell you how to do it, I wanted you to figure it out for yourself.  In hindsight, maybe that wasn't the smartest idea I have ever had, however, every single one of you who has added flutter to your straps has done it a different way, different widths, different shape and different amounts of gather.  If you haven't liked the first ending, you have tried again a different way the next time, or you have flicked back a few pages (reverse sewing / unpicked it) and changed the ending!  That is the essence of 'Design Your Own' and I love how you have embraced it!

I have SO many favourites and SO many that I love and am constantly blown away by all your photos in the pattern club, but here are a few people who have embraced the concept and run with it with fabulous results!

Patterns are available via my website with instant download. 


From Pinny to Playsuit!  Bubtique