GET THE 'FOR MONSTER AND MISS' LOOK
Marilyn has kindly shared her secrets for how she adds a sash to her pinny!
1. Make your pinny to where you have attached waistband facing (before sewing the side seams *step 17*)
2. Cut 2 strips of fabric 4" x 20" (10cm x 51cm). With right sides together sew 3/8" (1cm) seam along open long side and across short end.
3. Fold the stitched end at right angles and press. Now stitch along this line.
4. Trim along the angled line and snip pointed ends. Turn sash right side out and press. Make 2 sashes the same.
5. On the raw end of both sashes do a gathering stitch and gather up to match width of waistband.
6. Pin then baste in place.
7. To make the bow holder, cut a piece of fabric 3" x 2.5" (7.5cm x 6.5cm)
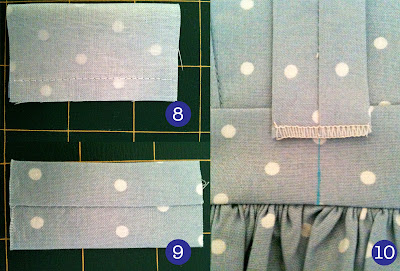
8. Fold in half with right sides together along the longer edge and sew 1/4" (0.7cm) seam.
9. Turn right side out and press with seam down the middle. Overlock both raw edges. Find centre of bodice and mark with fabric pen. Keep facing of waistband towards bodice as you don't want to catch it when you sew the bow holder in place.
10. Pin bow holder right side down onto waistband approx. 1/4" (0.7cm) from top of waistband, lining up centre and seam of bow holder. Sew bow holder in place making sure to reverse stitch either end to secure.
12. Thread pointed end of sash through bow holder
13. Thread the other sash through holder
14. Now take the pointed end of the left hand sash and thread through holder
15. Then repeat with the other sash
You now have your sash bow. You can handstitch to keep in place but I prefer not to as it makes it easier to iron after laundering.


